
Emma Colins
EyebrowGel Contributor · Updated August 3, 2026
How to use eyebrow gel: start with clean, dry brow hairs, remove excess from the spoolie, coat the hairs before shaping them, then brush each brow zone in its natural direction. For a first attempt, the safest-looking finish comes from one thin layer and a final check before the gel dries.
This beginner tutorial shows the complete routine, including how much brow gel to use, where to start with tinted gel, how to apply brow gel over pencil, and what to do when your brows look clumpy or too dark.
Key Takeaways
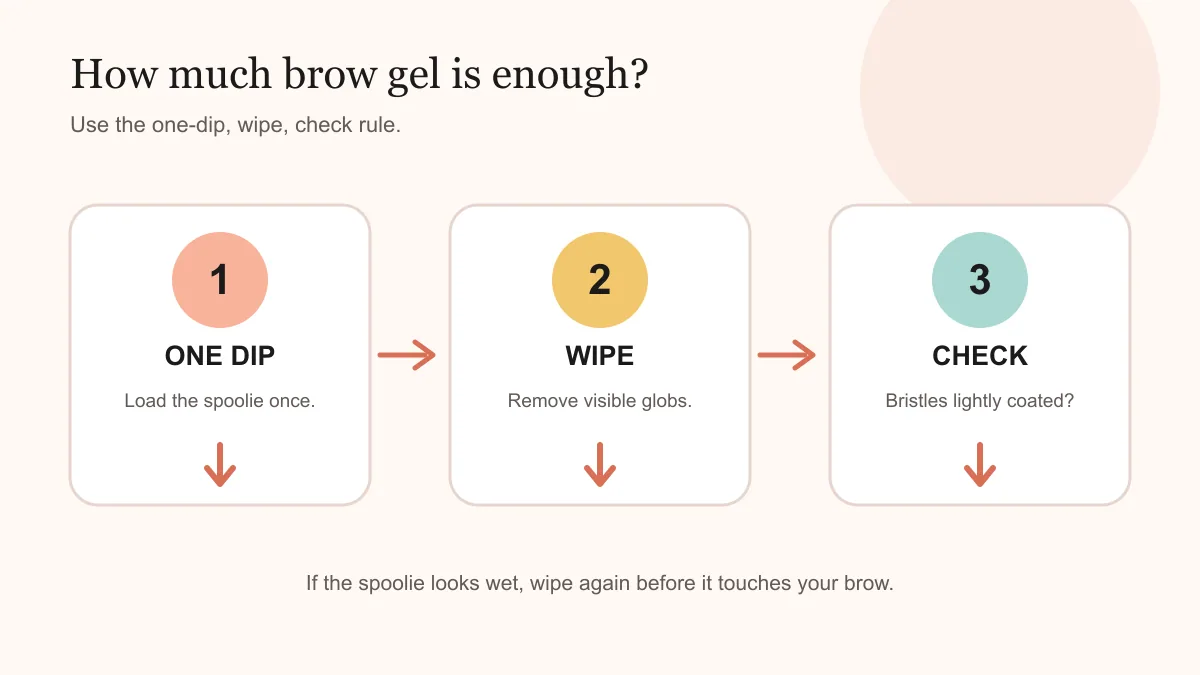
- Use one dip, wipe visible excess, and check that the bristles look lightly coated before applying.
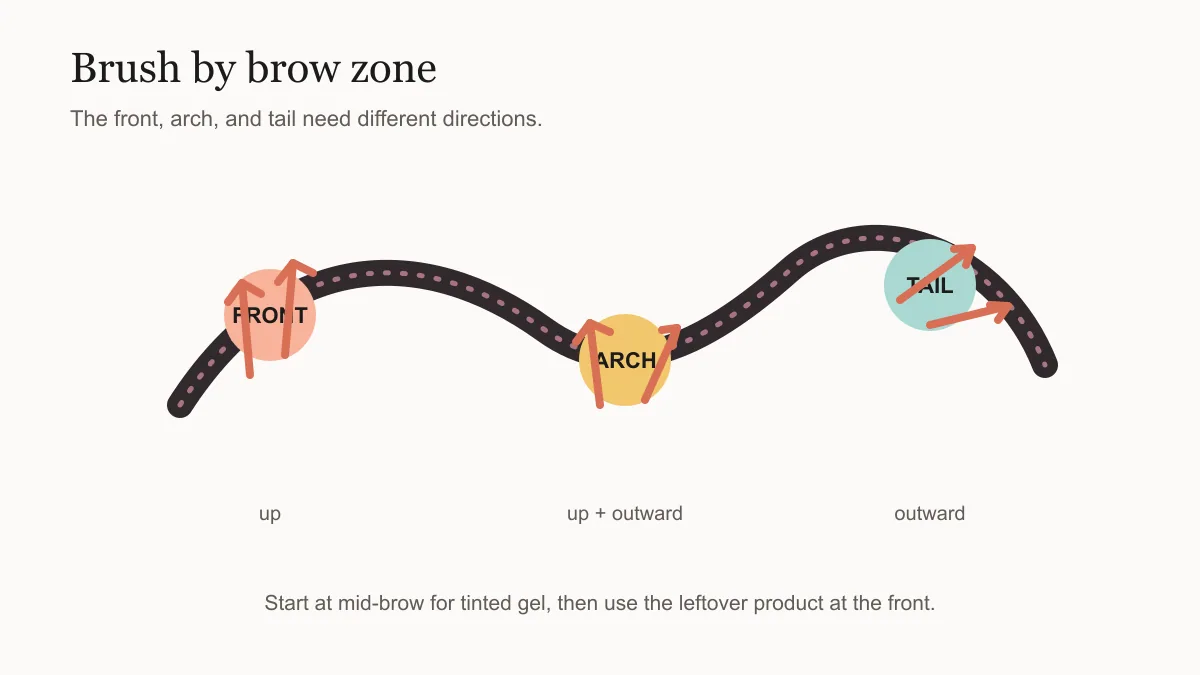
- Brush the front up, the arch up and outward, and the tail outward rather than forcing the entire brow in one direction.
- For tinted gel, start at mid-brow and use the leftover product at the front for a softer finish.
- Shape while the gel is still workable, then stop once the brow looks balanced.
On This Page
What You Need Before You Start
To learn how to use eyebrow gel, you do not need a full brow kit. A tube of clear or tinted eyebrow gel, the attached spoolie, a clean tissue or cotton swab, and a mirror are enough. Set aside about three minutes the first time so you can work slowly instead of trying to correct a rushed, dried layer.
- Clear gel: best when you mainly want hold and your brow color already looks full enough.
- Tinted gel: adds color and visible definition while it holds the hairs, but it needs a lighter hand.
- Clean spoolie: useful for brushing before application and for removing small excesses after the gel is applied.
- Clean, dry brow area: remove old makeup or oily skincare from the hair, then let it dry before applying gel.
If you are still choosing a formula, start with our best eyebrow gel guide. It is easier to learn the technique with a product whose brush and hold match your brow density than to keep adding layers to compensate for a formula that is too weak or too wet.
How to Use Eyebrow Gel: Step-by-Step
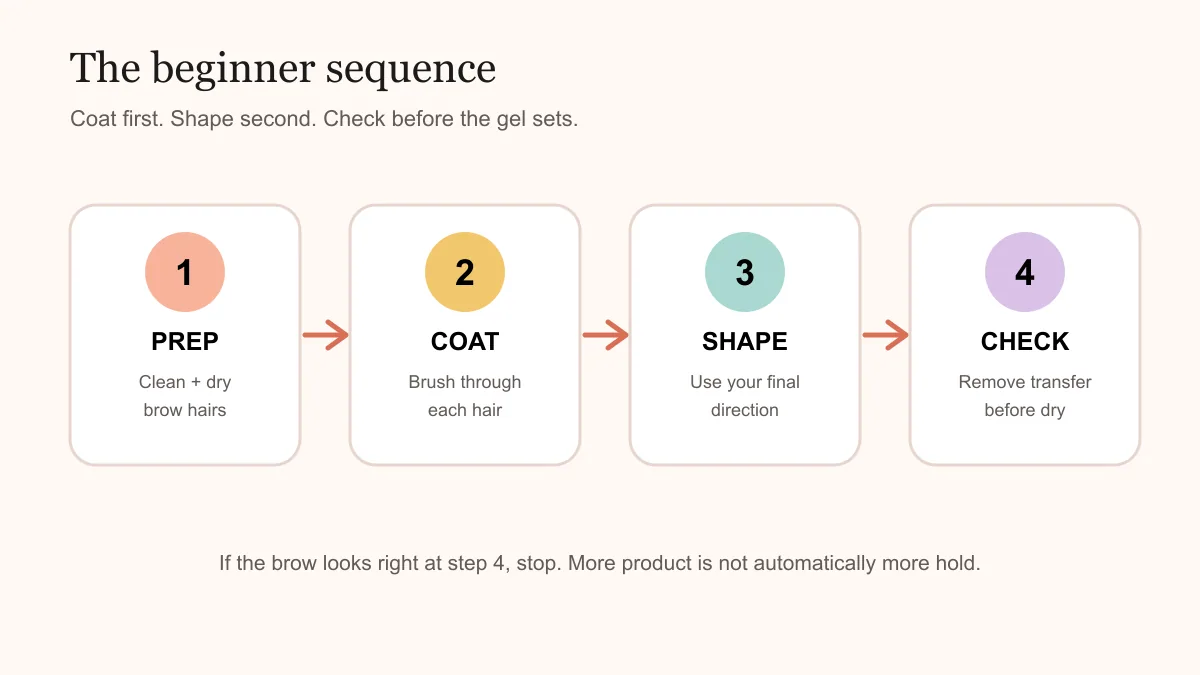
Step 1: Prep the brow hairs
By the end of this step, your brow hairs should be clean, dry, and easy to see. Use a cotton swab or a small amount of your usual makeup remover to lift away leftover foundation, sunscreen, skincare, or yesterday’s brow product. Do not scrub the skin. Pat the area dry and wait a moment if the hairs still feel damp.
This matters because product sitting on top of oil or skincare can make the gel slide, spread onto the brow bone, or dry unevenly. The fresh Makeup.com beginner guide also treats an even pass through the brow hairs as the foundation for a natural or feathered finish.
Check: if you run a clean spoolie through the brow, the hairs should move without catching on wet skincare or visible flakes.
Step 2: Load the spoolie with a thin coat
When learning how to use eyebrow gel, pull the wand out once, then wipe visible globs against the inside rim of the tube. If the spoolie still looks wet, wipe it again. You want the bristles to look lightly coated, not glossy and dripping. This is the most useful beginner rule for avoiding clumps because you can always add a little more, while an overloaded first pass is harder to undo.
The Maybelline eyebrow gel tutorial gives the same practical warning for pigmented gel: remove excess from the wand before it reaches the brow. With tinted formulas, that small pause also reduces the chance of placing the strongest color at the inner front of the brow.
Step 3: Coat each hair before setting the shape
By the end of this step, each brow hair should have a light layer, but the brow should not yet look pressed flat. Start with short strokes through the hair. For a stronger hold, brush gently against the direction of growth for one pass, then bring the hairs back into place. The NYX brow gel guide recommends this coat-against-the-grain step before returning the hairs to their final direction.
Use the narrow side of the spoolie whenever possible. It keeps more formula on the hair and less on the brow bone. Do not repeatedly drag the full brush across the skin. If the front of the brow is naturally sparse, use the side of the brush and shorter movements there instead of pushing a large amount of tinted gel into the area.
Step 4: Shape the brow in three zones
The goal is not to brush every hair straight upward. A natural brow usually looks more balanced when the direction changes from front to tail:
- Front: brush mostly upward. Use short strokes and the leftover product on the spoolie.
- Arch: brush upward and slightly outward, following the lift you want rather than forcing hairs vertical.
- Tail: brush outward toward the temple. This keeps the tail from looking like a separate, downward-pointing block.
Check: step back from the mirror. You should see the outline of your natural brow, not a solid stripe of product. If one section looks heavier, use a clean spoolie to separate the hairs before the gel sets.
Step 5: Choose a natural or laminated finish
For a natural everyday brow, stop after the directional pass and let the gel dry without pressing the hair hard against the skin. For a more lifted or laminated-style finish, brush the hairs into position and use the flat side of a clean spoolie to press them gently for a few seconds. Makeup.com’s tutorial describes this press-and-lock approach with a clear, strong-hold gel.
Do not keep brushing once the formula has started to set. Reworking a drying layer is one of the easiest ways to create flakes and broken-looking clumps. If you need to change the shape, do it while the brow is still flexible, then leave it alone.
How to Use a Spoolie Correctly
Understanding how to use eyebrow gel starts with light spoolie pressure and short strokes that follow natural growth.
A key part of learning how to use eyebrow gel is controlling the spoolie. Hold it near the middle of the handle, not right at the bristles. A lighter grip gives you more control and makes it easier to use short strokes. Place the brush into the brow hair, not directly onto the skin, then rotate the handle slightly as you move so the bristles catch the hairs instead of pushing them into one flat line.
Use the narrow end of a small brush for the front and tail. Use the fuller side through the arch. If the attached applicator is too large for your brow, a clean disposable spoolie can give you a more precise application, but do not share tools or use a dirty brush near the eye area.
How Much Brow Gel Is Too Much?
A reliable rule for how to use eyebrow gel is to begin with less product than the wand initially holds.
You have used too much when the hairs stick together into visible spikes, the skin around the brow looks wet, or the product remains obvious after you step back from the mirror. A little shine while the gel is wet is normal. A glossy film that stays visible after the formula dries usually means the layer was too thick or the product was pressed onto the skin.
For a second pass, do not reload the spoolie automatically. Use the product already left on the brush or a clean spoolie to separate the hairs. If you still need more hold, add a very small amount to the arch and tail first, then reassess the front. The inner brow rarely needs the same amount as the denser middle.
Eyebrow Gel Alone, Over Pencil, or Before Pencil?
How to use eyebrow gel in your routine depends on whether you need only hold or also need missing shape and color.
Use eyebrow gel alone when your main goal is grooming and hold. Use tinted gel alone when you want a quick wash of color and your brows already have enough hair to catch the pigment. Use a pencil or pen first when you need to draw individual strokes into genuinely bare gaps, then set the finished shape with gel.
There is one useful exception: if thick or unruly hairs keep hiding the gaps you want to fill, brush them into place with a small amount of clear gel first. Let the shape become workable, add pencil lightly where needed, and then use a final minimal coat only if the product instructions support layering. For most beginners, pencil first and gel second is the simplest order.
Makeup.com’s guide notes that both orders can work depending on the look and product. The decision is practical: gel last gives the most straightforward lock-in, while clear gel first can make difficult brow hairs easier to map.
Common Beginner Mistakes and Quick Fixes
Learning how to use eyebrow gel becomes easier when you correct excess product before the formula dries.
The brows look clumpy or crunchy
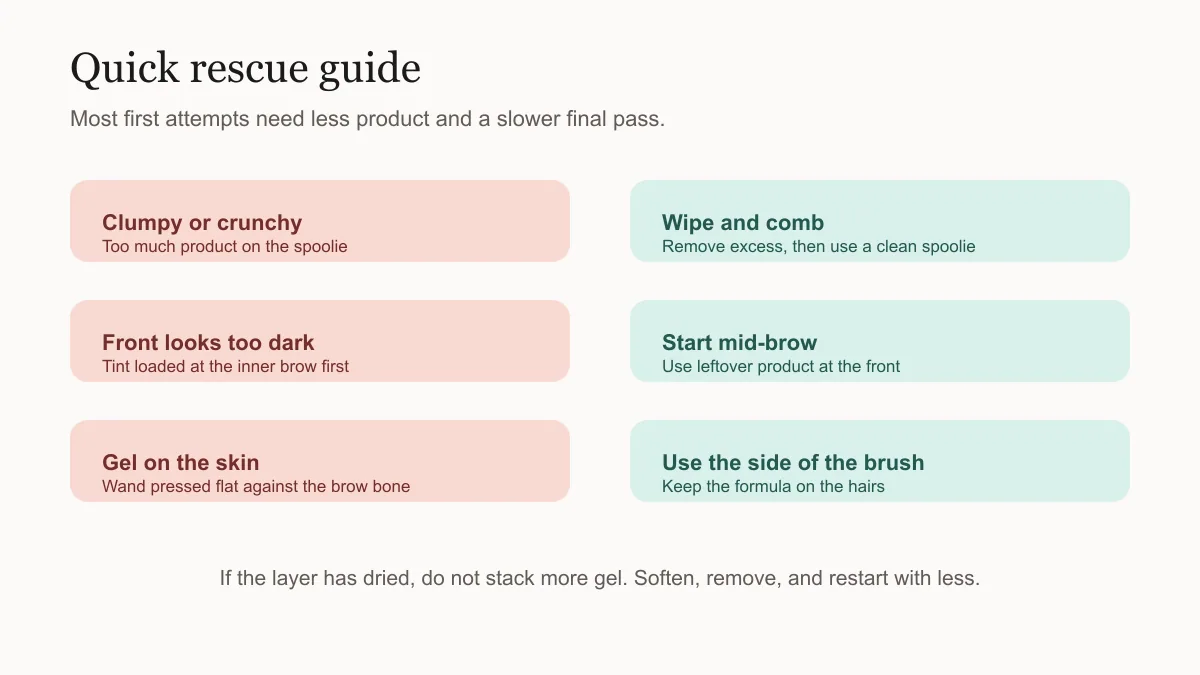
The usual cause is too much product on the first pass. If the gel is still flexible, wipe the clean spoolie and comb through the clumps with light pressure. If the layer has dried, do not stack more gel on top. Soften and remove the existing layer, then restart with a lighter coat.
The inner brow looks too dark
Tinted gel carries more product near the front when you begin at the nose. Start at mid-brow and work toward the tail, then use the leftover product at the front. If the color is already too strong, use a clean spoolie to distribute it through more hairs or gently remove the front section before it dries.
The gel gets on the brow bone
A large brush, a flat grip, or a fully loaded wand can transfer product onto skin. Wipe the brush, turn it so the narrower side meets the hair, and use shorter strokes. A cotton swab can lift a fresh mark before it dries, but avoid rubbing the skin repeatedly.
The hold disappears quickly
Check the prep before assuming you need more product. Skincare or oil on the hairs can weaken the first pass, and a light flexible gel may not control thick, downward-growing hair. For more targeted advice, see our guide to eyebrow gel for oily skin or compare stronger options in our long-lasting eyebrow gel guide.
When to Apply Brow Gel in Your Makeup Routine
How to use eyebrow gel with other makeup depends on the finish: soft definition before heavy powders, final hold after pencil.
If you are deciding when to use eyebrow gel, the simplest routine is to apply it after skincare has settled and after any pencil, powder, or pomade. That lets the gel lock the finished shape without dragging color around. If you are using only clear gel, you can apply it earlier when you want the hairs to guide where you fill, but keep the layer light so pencil can still glide over it.
- Finish skincare and allow the brow area to dry.
- Brush and fill sparse areas with pencil, powder, or pen if needed.
- Apply eyebrow gel with the one-dip, wipe, check rule.
- Shape by zone and remove any transfer before the gel dries.
The exception is a very unruly brow that needs to be held in place before you draw. Use clear gel first, fill only after the hairs are positioned, and avoid a heavy second coat. The goal is to use the order that improves control, not to follow a rigid rule that makes the routine harder.
How to Remove Eyebrow Gel Safely
Knowing how to use eyebrow gel also means knowing how to remove it. At night, use a makeup remover or cleanser that your skin already tolerates. Let it soften the brow gel, then wipe gently in the direction of hair growth. Do not scrape dried product from the brow hairs, and do not tug at the skin near the eye. Follow the package directions if the formula calls for a specific remover.
The FDA’s eye-cosmetic safety guidance recommends clean hands and tools, avoiding shared eye cosmetics, and taking care not to scratch the eye area during application or removal. Stop using a product if it causes irritation; if irritation persists, seek medical advice.
Frequently Asked Questions
These answers cover how to use eyebrow gel cleanly, comfortably, and without creating a stiff beginner result.
Do you put eyebrow gel on before or after pencil?
Usually after pencil. Fill the sparse areas, soften the strokes with a spoolie, then use a thin layer of gel to set the shape. Clear gel can go first when you need to hold unruly hairs in place while you map the brow.
How much eyebrow gel should I use for the first time?
For anyone learning how to use eyebrow gel, load the spoolie once, wipe away visible globs, and check that the bristles look lightly coated. Start with one thin layer. If the brow still needs more control, add a small amount only to the arch or tail rather than reloading the entire brush.
How do I apply brow gel without it looking clumpy?
Remove excess from the wand, use short strokes, coat the hairs before shaping, and do not keep brushing after the gel begins to dry. A clean spoolie can separate a fresh clump. Once the layer is dry, remove it and restart instead of adding more product.
Can I use eyebrow gel on its own?
Yes. Clear gel works well when you want hold without color. Tinted gel can be used alone when your brows have enough hair to catch the pigment and you only want light definition. Use a pencil or pen for bare gaps that gel cannot create hair in.
How long should eyebrow gel dry before touching it?
Let the formula set according to its label and avoid repeatedly touching it while it is drying. The exact time varies by formula, amount, humidity, and the shape you created. If you need to adjust, do it immediately after application rather than waiting until a hard film has formed.
Can I use regular hair gel on my eyebrows?
Use a product made for the brow or eye area instead. Hair gel is designed for the scalp, while eyebrow gel is packaged and labeled for use close to the eyes. The FDA advises using cosmetics near the eyes only when they are intended for that area.
The beginner rule
Use less gel than you think, work in the direction each brow zone wants to go, and stop when the hairs look separated and controlled. Good eyebrow gel application is more about precision than pressure.
Cosmetic labels and formulas can change. Follow the current product instructions, keep the applicator clean, and stop using any product that causes irritation.