
Emma Colins
EyebrowGel Contributor · Updated August 4, 2026
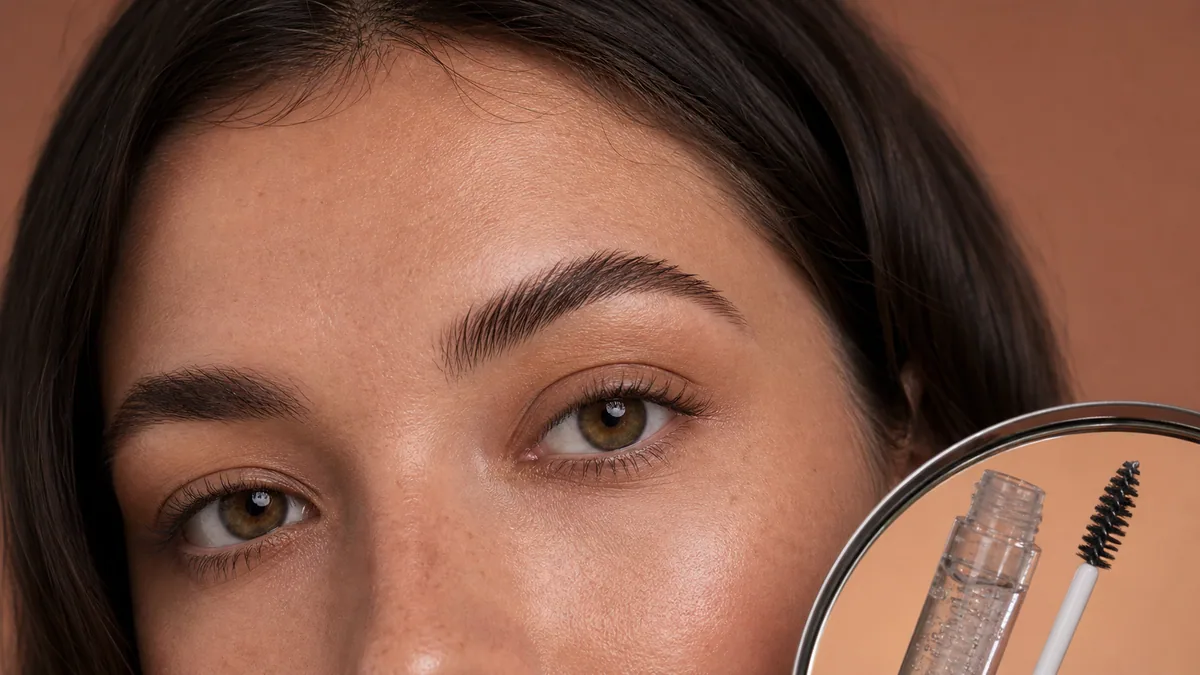
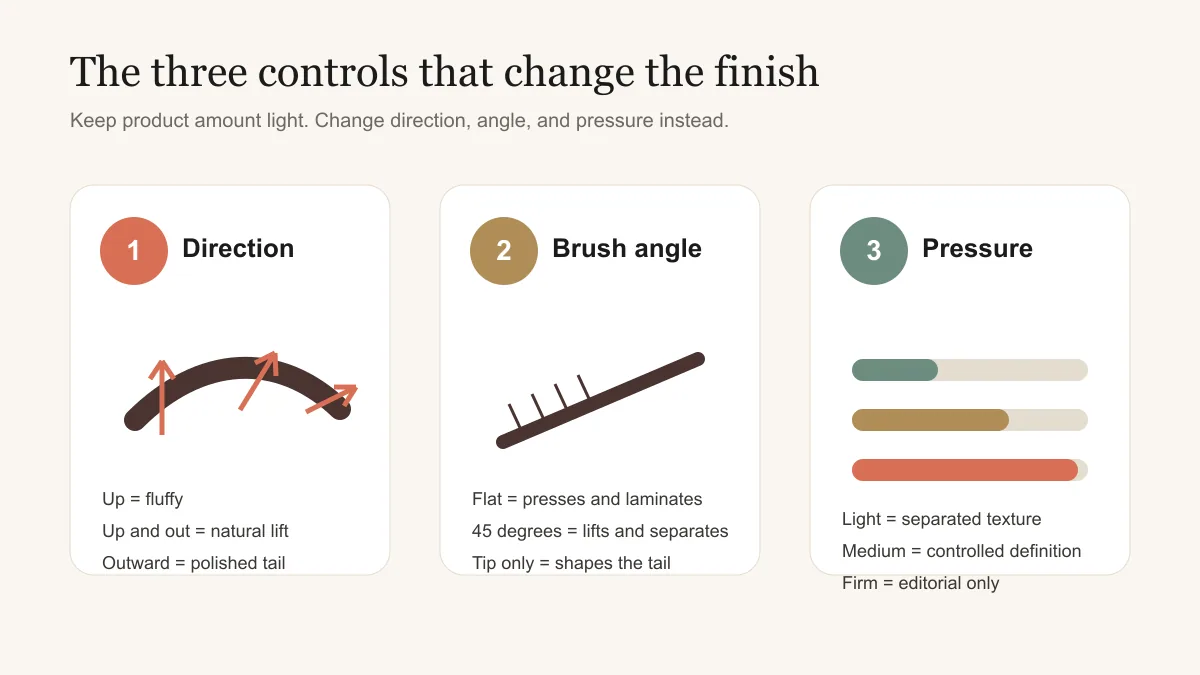
How to apply eyebrow gel for an advanced look: choose the finish first, then control three things: hair direction, spoolie angle, and pressure. A light upward pass creates fluffiness. A flatter brush and firmer press create a laminated-style finish. Short outward strokes make a brow look defined without turning it into one solid block.
This guide shows five distinct brow looks using the same repeatable system. If you still need help with product amount, basic brush handling, or makeup order, start with our beginner guide to using eyebrow gel. Here, we focus on styling decisions rather than first-use fundamentals.
Key Takeaways
- Use light pressure for separated texture, medium pressure for definition, and firm pressure only where you want a pressed finish.
- Change the top edge of the brow before changing the whole shape. That small adjustment often creates the look.
- A laminated-style gel look is temporary styling, not the same process as a professional chemical brow-lamination service.
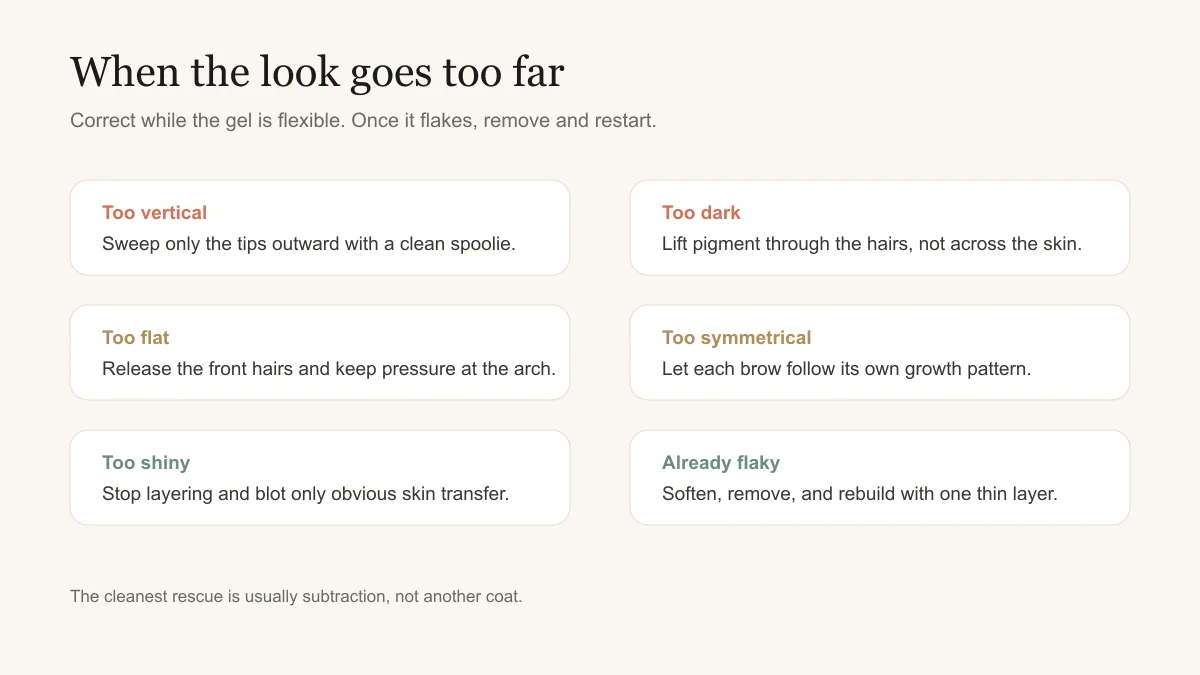
- Correct an overdone finish with a clean spoolie while the gel is flexible. Once it flakes, remove and restart.
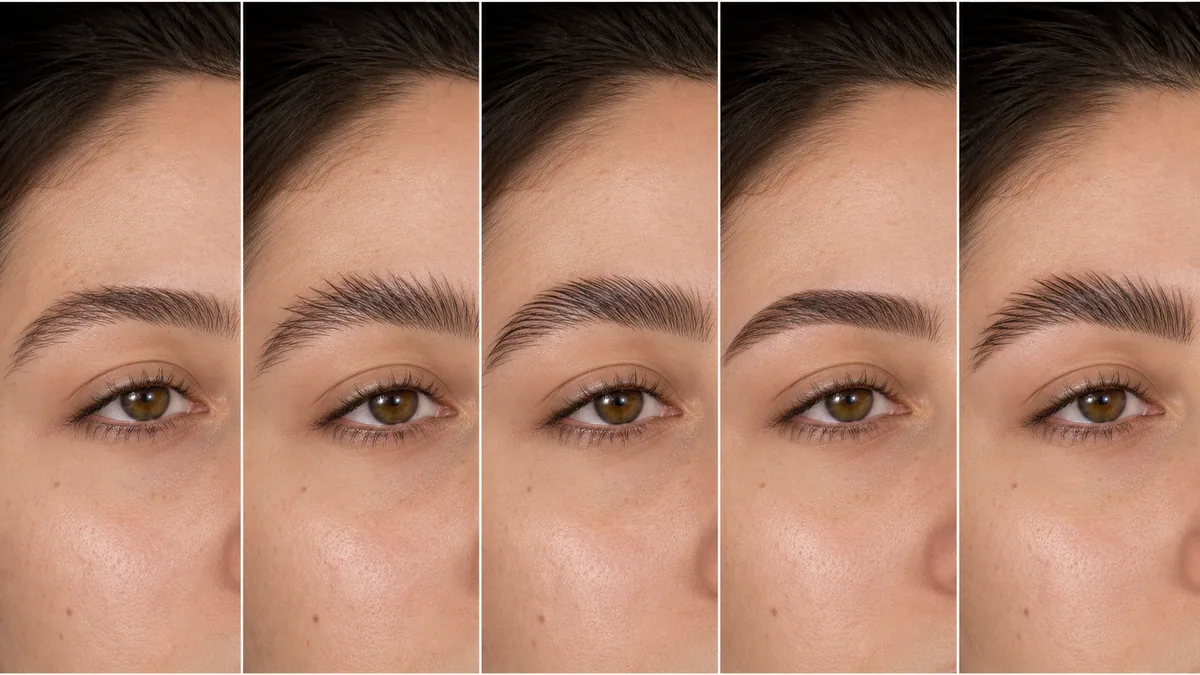
Choose the look from your starting brow
Before deciding how to apply eyebrow gel, look at the direction your hairs naturally resist. Hairs that already grow upward need less pressure for a fluffy finish. Downward-growing hairs usually need stronger hold at the root, but pressing every tip flat can make the brow look heavy.
Use the natural look when you want grooming without changing the silhouette. Choose fluffy when separation creates useful fullness. Pick polished when the arch and tail need control. Try laminated-style when lift is the priority, and reserve editorial direction for a deliberate statement.
On This Page
Look 1: How to Apply Eyebrow Gel for a Natural Finish
A natural finish should look like your brow on a cooperative day. The hairs stay separated, the arch keeps its normal curve, and the gel is visible only through improved control. Use a flexible clear gel when you already like your brow color. Choose a lightly tinted gel when a few pale hairs disappear against the skin.
Start at mid-brow and sweep upward and outward. Use the product left on the brush at the front, where too much tint looks obvious fastest. At the arch, rotate the handle slightly so the bristles separate the hairs instead of painting over them. Finish the tail with the tip of the spoolie.
When learning how to apply eyebrow gel this way, compare the lower brow line before and after. It should remain soft. If gel has created a visible painted edge, the brush touched too much skin. Lift the hairs with a clean spoolie and remove the transfer with a precise cotton swab before it dries.
If it looks too styled: pass a clean spoolie over only the top edge. Do not comb through the entire brow again. Softening five or six upright tips is usually enough to restore a natural outline.
Look 2: The Fluffy Feathered Brow
For this finish, how to apply eyebrow gel comes down to separating hairs with light upward and outward strokes.
The fluffy brow gel technique creates visible air between hairs. It needs lift without flattening, so keep the spoolie angled rather than pressing its full side against the skin. A small brush is useful because it can catch shorter front hairs without coating the entire brow bone.
Brush the inner third mostly upward. Move diagonally through the arch, then outward through the tail. The NYX feathered brow tutorial uses the same useful change from vertical front strokes to diagonal tail strokes. That shift keeps the finish lifted without making every hair stand at attention.
For sparse areas, a fiber gel can add visible texture to existing hair, but it cannot create hair where none exists. If the gaps still interrupt the shape, add a few fine pen or pencil strokes after the first gel pass. Our guide to eyebrow gel for sparse brows explains when fibers help and when a fill product is more reliable.
A useful way to practice how to apply eyebrow gel for fluffiness is to style one brow and leave the other untouched for a minute. Check whether the styled brow looks fuller because the hairs are separated, or simply darker because it carries more product. If color creates most of the difference, wipe the wand more thoroughly and repeat with lighter pressure.
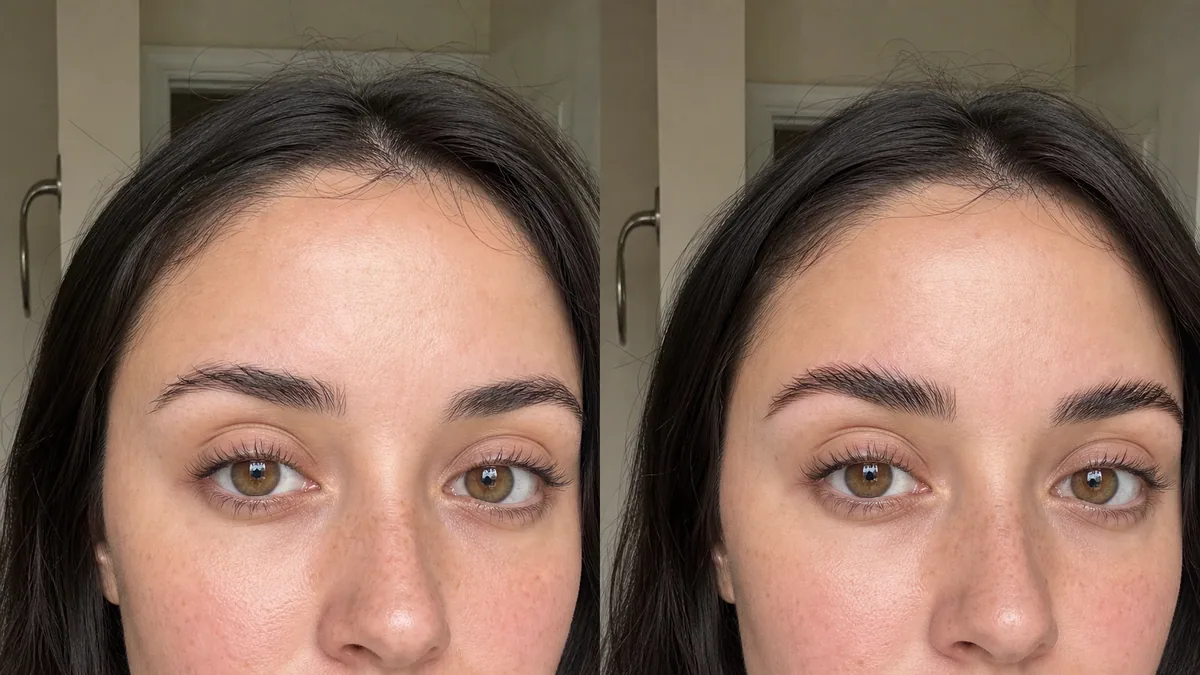
If it looks too spiky: wait only a few seconds, then sweep the very tips outward with a clean spoolie. Keep the roots lifted. This preserves fullness while removing the fence-like top edge that makes fluffy brows look forced.
Look 3: The Laminated Brow at Home
Knowing how to apply eyebrow gel for a laminated effect means pressing at the roots without flattening every tip.
A laminated-style brow made with gel is a temporary makeup effect. It does not chemically reshape the hair like a professional lamination service. Use a strong clear gel with enough working time to position the hairs before it sets.
First, coat the hairs lightly from root to tip. Brush them upward and slightly outward. Then turn the spoolie nearly flat and press the arch against the skin for a few seconds. Leave the front a little less compressed. That small difference prevents the entire brow from looking pasted down.
The e.l.f. laminated brow guide also separates lifting, shaping, and setting rather than treating them as one endless brushing motion. Stop once the hairs hold their direction. Reworking a half-dry hold polymer, such as PVP, can break the film and create flakes.
Face shape does not require one fixed brow. Use your brow bone and natural arch as reference points, not rules that force a new outline. When you apply eyebrow gel for a laminated effect, preserve the tail length and avoid pushing every hair straight up. An upward-and-outward angle usually sits more comfortably with the existing shape.
If it looks too flat: release the first few hairs with the tip of a clean spoolie. Keep the stronger press under the arch, where it contributes lift and symmetry without erasing all texture.
Look 4: The Defined and Polished Brow
The polished brow is controlled at the lower line and tapered at the tail. It does not need the solid, sharply outlined block that older brow tutorials often produced. Choose a tinted gel with a narrow applicator or use clear gel over precise pencil strokes.
Begin at the arch, not the front. Use short upward-outward strokes to establish height, then use the spoolie tip to direct the tail. Once the top line looks balanced, run the narrow side of the brush along the lower hairs. You are aligning hair, not drawing a wet border on the skin.
Check both brows from normal conversation distance. Match their overall height and tail direction, but do not chase perfect mirroring. Natural brows have different growth patterns. Repeated correction often makes the stronger brow darker while the weaker brow remains weaker.
To learn how to apply eyebrow gel with more symmetry, style the weaker brow first. It sets the realistic limit for height and fullness. Then bring the stronger brow toward it. Starting with the fuller brow often creates a target the sparse side cannot reach with gel alone.
If it looks too dark: place a clean spoolie underneath the hairs and roll upward. This lifts excess pigment through the hair. Brushing sideways across the skin usually spreads the tint and makes the outline broader.
Look 5: The Dramatic Editorial Brow
An editorial brow exaggerates one idea on purpose: height, separation, texture, or asymmetry. It should look intentional rather than simply overloaded. Strong clear gel works well because the structure remains visible without automatically adding more darkness.
Choose the direction before touching the brow. For a brushed-up runway effect, lift the front vertically, angle the arch toward the temple, and keep the tail almost horizontal. Use medium pressure at the roots and lighter pressure at the tips. This creates structure underneath while preserving movement on top.
For more graphic separation, use the spoolie tip to group two or three hairs at a time. Leave a small amount of negative space between groups. Do not add a third coat simply because the shape is dramatic. Editorial styling is controlled exaggeration. Too much wet product tends to remove the detail you were trying to create.
Photograph the result in ordinary daylight before deciding it needs more. Bathroom lighting can hide shine and skin transfer. A quick phone photo shows whether the brow reads as structured from a normal distance. This is especially helpful when how to apply eyebrow gel becomes less about hold and more about designing a visible shape.
If it looks accidental: make one area quieter. Soften the front or smooth the tail, then leave the arch as the focal point. When every section competes, the result reads as a mistake rather than a choice.
Choosing the Right Gel for Each Look
The decision about how to apply eyebrow gel should follow the formula strength, brush size, and finish you selected.
Choose gel by the movement you want after dry-down. Flexible clear formulas suit natural and soft feathered brows. Tinted or fiber formulas add visible texture to existing hair. Strong clear formulas suit laminated-style and editorial shaping. A small tinted brush gives the most control for polished arches and tails.
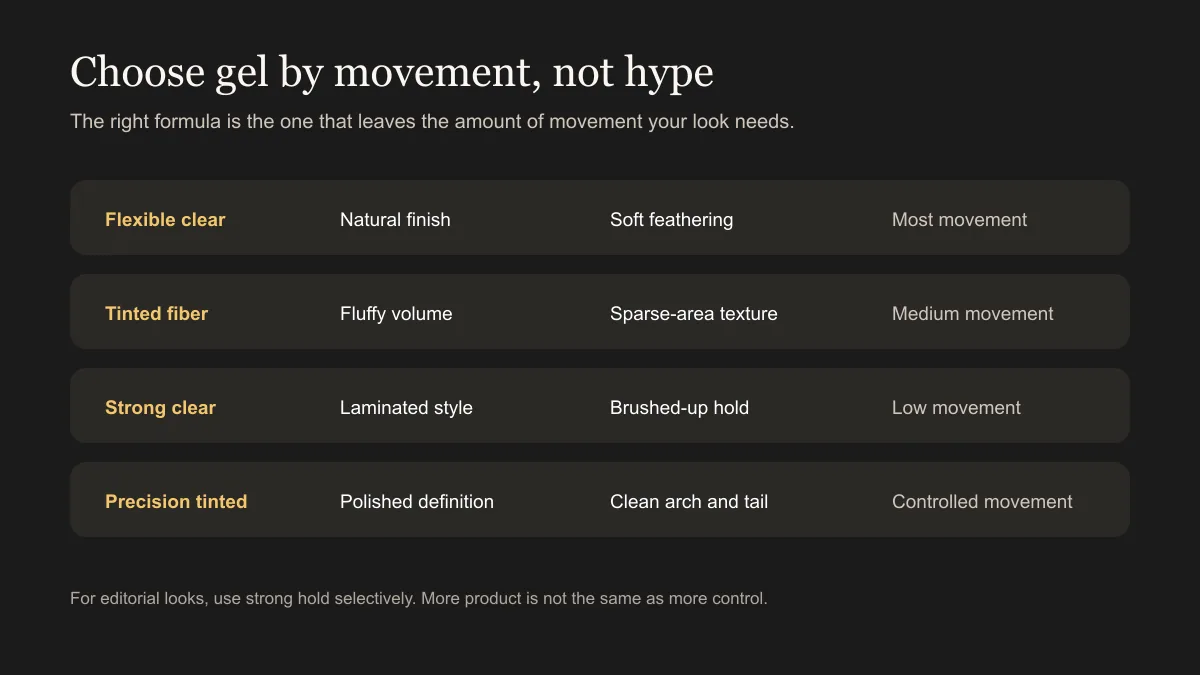
If your brow hairs are coarse or downward-growing, compare stronger options in our long-lasting eyebrow gel guide. If skincare or sebum breaks down the finish by midday, the preparation may matter more than switching styles. See our guide to eyebrow gel for oily skin.
Acrylates copolymers and PVP are common hold polymers that form a film around the hair as the formula dries. The ingredient name alone does not tell you the exact hold. Concentration, brush design, water content, and the rest of the formula all change how that film feels.
Brush size matters just as much as the formula. A large spoolie distributes gel quickly through dense brows. A micro-spoolie gives more control at the front and tail. If you keep touching the brow bone while learning how to apply eyebrow gel, switch applicator size before blaming your technique.
2026 Brow Trend Breakdown
In 2026, how to apply eyebrow gel matters more than copying one rigid trend across every brow shape.
The useful 2026 shift is not one mandatory brow shape. It is movement away from a rigid, identical finish for everyone. British Vogue’s 2026 trend report highlights softer, natural brows and a more undone result. Teen Vogue’s trend guide also keeps fluffy, feathered brows in the mix while stressing shape choice.
That means the natural and fluffy looks are the most adaptable starting points. Laminated and editorial finishes still work when they suit the hair pattern and the rest of the makeup. The trend is less about forcing every brow upward and more about making texture look deliberate.
The Korean brow look often appears straighter and softly filled rather than highly arched. Brow gel can support that direction by guiding the arch outward, but it should not be used to conceal or redraw the entire natural shape. For a softer straight effect, keep the front airy, reduce vertical lift at the peak, and taper the tail without pulling it down.
Whatever trend you choose, the most useful test is simple: does the styled brow still make sense when the rest of your makeup is minimal? If yes, you have probably changed direction rather than disguising the brow. That is the durable skill behind how to apply eyebrow gel in 2026.
Frequently Asked Questions
How do you apply eyebrow gel without making brows look stiff?
Use one thin layer, hold the spoolie at an angle, and avoid pressing every hair against the skin. Shape while the formula is flexible, then stop brushing. A flexible-hold gel is usually better than maximum hold for a natural finish.
Can eyebrow gel create a laminated brow look at home?
A strong clear gel can create a temporary laminated-style look. Brush the hairs up and outward, then press the arch with the flat side of the spoolie. This is makeup styling, not the same as a chemical brow-lamination service.
How do you get fluffy natural brows with brow gel?
Use vertical strokes at the front, diagonal strokes through the arch, and outward strokes at the tail. Keep pressure light so the hairs stay separated. If the tips look spiky, sweep only the top edge outward with a clean spoolie.
Should eyebrow gel go before or after pencil for advanced looks?
For natural and polished looks, pencil usually goes first and gel sets the result. For fluffy or laminated-style brows, a light clear-gel pass can establish direction before you add a few hair-like strokes into visible gaps.
Why does brow gel flake when I reshape it?
The hold film has probably started to set. Brushing through a half-dry polymer film can break it into visible pieces. Make direction changes immediately. If flaking has begun, remove the layer rather than covering it with more gel.
Which advanced brow look works best for sparse brows?
A soft fluffy or defined look usually uses existing hair most efficiently. A tinted fiber gel can add texture, while a few pencil or pen strokes can bridge bare gaps. A heavily pressed laminated finish may expose gaps if all hairs move in one direction.
The advanced rule
Decide what should move and what should stay controlled. Direction creates the look. Pressure decides whether it feels soft, polished, or editorial.
Generated visuals on this page are illustrative references. Results vary with natural hair density, growth direction, gel formula, and technique. Follow current product instructions and stop use if irritation occurs.